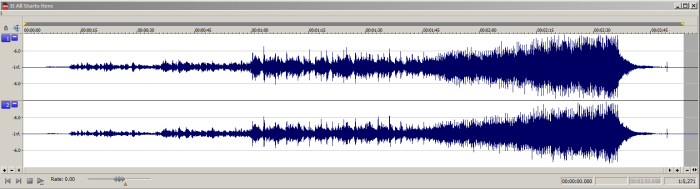
Alright, so now we have a solid clip to work with. Let’s pull it up again and take a look:
At this point, what I always do when I’m either remastering something old, transferred from a non-digital source, or simply mastering something I made, is normalize it. This is so basic that many editors don’t consider it an effect at all, so you might find it under your Edit menu, or in the case of Sound Forge, under the Process menu. (Audacity puts it under the Effect menu, and Adobe Audition puts it under the Amplitude and Compression section of the Effects menu)
Normalization is a dirt simple process that simply scans the whole waveform, finds the highest peak, figures out a multiplier that will take that peak to the maximum value that can be represented by your waveform’s bit depth, and multiplies every sample by that amount. Too fancy sounding? In real terms, it cranks the master volume knob up to the maximum it can go without causing any distortion. No matter what you’re doing during a mastering process, you want to start from this point, because you won’t be mixing tracks together so you won’t need any headroom, and you want to push everything to the best workable volume before you start manipulating anything.
Now that I’ve said all this, I have to point out that in this example, starting with normalization does nothing for us. In general, this is true whenever you’re working with already produced digital sources. You will almost never come across a commercially available recording that isn’t already normalized. If you look again at the waveform, you’ll see that near the end of it, there are individual peaks that pretty much max out the waveform’s boundaries, so there’s no room to boost the volume on this without those peaks getting clipped.
This leads us directly to one of the main problems I have with this recording, and a brief interlude…
Brief Interlude – Mastering/Remastering Strategy
Whether you’re mastering new material, or remastering existing stuff, you have to have a plan. It isn’t enough to just say “I want it to sound better”. You have to be able to determine the issues and limitations of the recording you’re working with, and figure out what you want to achieve. If you really don’t know, it can help to compare it to an existing recording that sounds like what you want, and figure out the differences. Things like “it’s generally louder”, “it has punchier bass”, or “it’s brighter and more detailed”.
In this case, I knew exactly what my problems were with the original. The first was that the dynamic range was too great. The difference between the quietest and loudest portions of the song are so dramatic that you need to adjust the volume over the course of the song to hear it properly, or else you either get annoyed that you can’t make out the beginning, or you blow your eardrums out near the end. As an aside, I understand the artistic direction they were going for here. It’s a “hidden” bonus track, so they wanted it to sneak up on you, and they wanted to build it up dramatically to overwhelm the listener. Sure, that’s great when you first discover the track, but I’ve been listening to it on repeat for months, so the novelty of that wore off right away, and I just want to listen to it without fiddling, while still preserving some of that effect.
The second issue I have is that it lacks clarity. Mostly in the high end. There is some content there to work with, thankfully, but overall the mix in the first half of the track is so dull sounding that I’d like to make the vocals and metal of the drum kit clearer. That’s entirely subjective. I just wanted it that way, because I generally like my recordings to sound crisp, clear, and detailed.
Those are the two things I was looking for, and I’ll give a piece of universal advice here. The order in which you do things is actually important. As a rule of thumb, which I’ve learned for myself, and other engineers have also confided about, you always want to do any volume or dynamics processing BEFORE you take on EQing issues. This is because odd things can happen when you’re changing the volume of a signal, especially using dynamics compression, that will change the character of the sound. If you EQ before that, you may find that you’ve overdone something, and have to go back, or that you’ve somehow defeated that you were trying to accomplish, and need to do more EQing after. The fewer steps in your process, the better, right?
So this is why the first thing I’m tackling is the volume issue. Here we go…
Volume Shaping With Clip Envelopes
I’ll admit it, I almost always throw a compressor on things right away. Yes, if you google “loudness war” you will find a ton of digital ink spilled about it. I agree with everything they say. But like anything, it is a case of “too much of a good thing” (and for non-artistic motivations) that has ruined so many recordings in the last few years. Compressors/limiters with gain compensation can achieve incredible things though, when used properly, and I’ll be talking about that next time.
The reason I’m not talking about it THIS time, is because I have to confess that I spent at least 45 minutes with this track throwing every dynamics compression tool at it I could think of, and nothing sounded good (yet). I’ll spare you the details, but I quickly realized that I had to do something much more basic and global to the track before I could get to that degree of volume tuning.
So the real problematic portion of this track is from around 1:48 to about 2:37. You can see what they’ve done just by looking at the waveform. The volume steadily increases, in an almost exactly linear fashion. It’s a fairly simple matter to “undo” this, and see if it helps.
For this, the easiest way is to pull the waveform into a multitrack view. Don’t ask me why most editors don’t let you do this easily in a single wave edit view, but it’s generally true. My preferred editor for this is Adobe Audition, but most editors work pretty much the same as this. The feature we want is almost universally called “clip envelopes”. To see and/or edit them, you may have to find setting in your pulldown menus that enable them. Audition puts all those under the view submenu, like this:

In Audition, you have some additional fancy features for working with envelopes (under Clip->Clip Envelopes submenu) that let you create smooth splines. For this, I really don’t need that. Straight lines work fine for me!
Once you’ve enabled these things, you’ll have the ability to graphically manipulate the volume (and pan, if you want to) of the track over time. Every tool I’ve ever used like this puts the volume line at the top, and the pan in the middle. In Audition, the green line at the top is the volume envelope we want to work with. To start, it simply looks like this:

The tiny white boxes at the upper left and right edges of the picture here are control points that you can click and drag to move this line around. As you’d expect, dragging down will lower the volume at the control point, and you’ll end up with a diagonal line connecting the two points. Fairly intuitive, once you start doing it. As an added bonus, when you hover over or drag a control point, a pop-up will show you the value, in dB, for that point. At +0 dB, you’re at full volume, and dragging down will bring you into the negatives.
Aside: dB, or decibels, are weird man! So is human hearing and our perception of “loudness”. Without getting too far into it, an increase or decrease of 3 dB is technically a doubling (or halving) of power, but it takes a 6dB change to result in a perceived doubling (or halving) of volume.
Where was I? Oh yeah, clip envelopes, control points…right. So you can create any control points you want just by clicking anywhere on the envelope line that doesn’t already have one. Drag ’em around, and make any kinds of volume adjustments you want. I ramped down the volume between 1:48 and 2:37, and then fairly quickly brought it back up again to full immediately after the last explosive drum hit. This involved a fair bit of zooming, panning, scrolling around, and auditioning the changes to make sure it sounded right, so this can take longer than you think. I settled on a drop of 5dB at the lowest point, because it ended up sounding reasonable, and flattened that section of the track almost perfectly. Here’s a zoom-in of what my envelop looked like:

When you’re working in multi-track, you typically have to “mix down” the results to get an output waveform. In Audition, it’s under file->Export->Audio Mix Down. This will save out the envelope changes to a new file. Pulling that file back into a regular wave editor, here’s what I got:
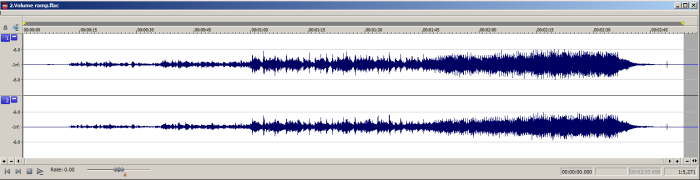
Pretty sweet. It still sounds good to my ears, and I bought myself nearly 6dB of headroom to work with. Hell, I’m going to normalize this right away! As I described above, that will maximize the volume…but now, it will effectively double the volume of the entire first section of the track, and bring the very loudest parts back up to roughly where they were before. That’s a simple matter of finding your normalize function, picking 100%, applying it, and saving out the result. Here’s what mine looked like:

That’s a lot of progress, IMHO. I’m not nearly done, but this is a good point to take a critical listen:
https://dl.dropboxusercontent.com/u/4006268/South_Dakota/3.Volume ramp(normalized).flac
…and about critical listening, some more advice. These kinds of changes can be very subtle. In fact, that’s often what you’re going for with remastering – making changes that improve things in a way that most people can’t quite put their finger on. So listen carefully, and try not to look at what all the waveforms, envelopes, knobs, and sliders are saying you should hear. Don’t even look at the screen! And try not to think too much about what changes you’ve made. Also remember that music listening is an emotional experience. The track you started with must have inspired you in some way that made you want to work so hard on it (unless you’re getting paid), right? If what you’re hearing makes you smile (or want to bawl your eyes out, or jump around the room like a madman) as much, or hopefully more than what you started with, you’re going in the right direction.
In the case of this track, you might notice that even though the entire last section looks like it’s all at the same volume, it still seems like it’s building and getting more powerful. There are other tricks the band has pulled to make it sound that way, and messing with the volume doesn’t seem to have diminished this. At this point, I’m still loving the track as much as I ever did, and now I can hear it all just a bit better, so I call this a win so far.
Next time, more dynamics tweaking with compressors, and maybe some sparkle.
Cheers!
umdesch4.
Part 3 here: https://umdesch4.wordpress.com/2014/09/21/remastering-tips-magic-man-part-3/


